Five ways to use SharePoint better! Download this poster, presented by Synterex at the 2022 American Medical Writers Association (AMWA) conference, or scroll down for a text-only version.
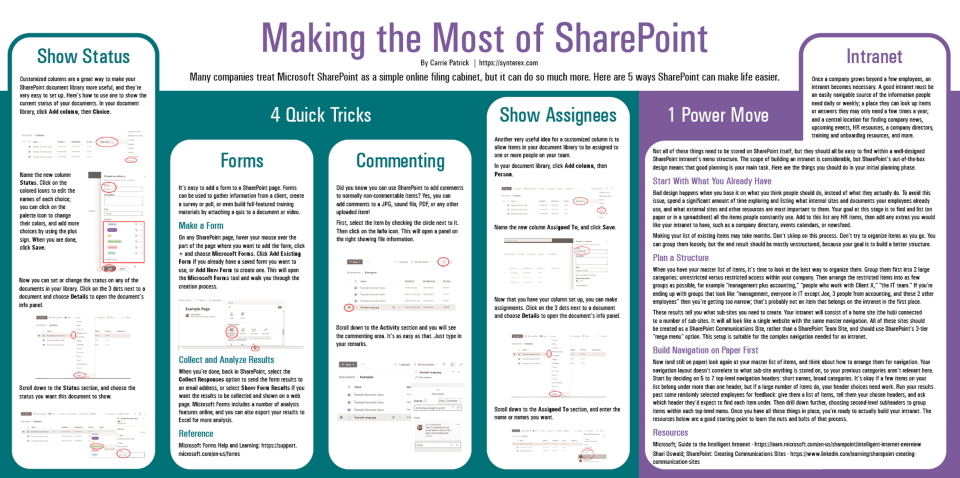
Many companies treat Microsoft SharePoint as a simple online filing cabinet, but it can do so much more. Here are 5 ways SharePoint can make life easier.
Show Status of a SharePoint File
Customized columns are a great way to make your SharePoint document library more useful, and they’re very easy to set up. Here’s how to use one to show the current status of your documents. In your document library, click Add column, then Choice.
Name the new column Status. Click on the colored icons to edit the names of each choice; you can click on the palette icon to change their colors, and add more choices by using the plus sign. When you are done, click Save.
Now you can set or change the status on any of the documents in your library. Click on the 3 dots next to a document and choose Details to open the document’s info panel. Scroll down to the Status section, and choose the status you want this document to show.
SharePoint Forms
It’s easy to add a form to a SharePoint page. Forms can be used to gather information from a client, create a survey or poll, or even build full-featured training materials by attaching a quiz to a document or video.
On any SharePoint page, hover your mouse over the part of the page where you want to add the form, click + and choose Microsoft Forms. Click Add Existing Form if you already have a saved form you want to use, or Add New Form to create one. This will open the Microsoft Forms tool and walk you through the creation process.
When you’re done, back in SharePoint, select the Collect Responses option to send the form results to an email address, or select Show Form Results if you want the results to be collected and shown on a web page. Microsoft Forms includes a number of analysis features online, and you can also export your results to Excel for more analysis.
Commenting
Did you know you can use SharePoint to add comments to normally non-commentable items? Yes, you can add comments to a JPG, sound file, PDF, or any other uploaded item! First, select the item by checking the circle next to it. Then click on the Info icon. This will open a panel on the right showing file information. Scroll down to the Activity section and you will see the commenting area. It’s as easy as that. Just type in your remarks.
Show Assignees on a SharePoint File
Another very useful idea for a customized column is to allow items in your document library to be assigned to one or more people on your team. In your document library, click Add column, then Person. Name the new column Assigned To, and click Save. Now that you have your column set up, you can make assignments. Click on the 3 dots next to a document and choose Details to open the document’s info panel. Scroll down to the Assigned To section, and enter the name or names you want.
Planning a SharePoint Intranet
Once a company grows beyond a few employees, an intranet becomes necessary. A good intranet must be an easily navigable source of the information people need daily or weekly; a place they can look up items or answers they may only need a few times a year; and a central location for finding company news, upcoming events, HR resources, a company directory, training and onboarding resources, and more.
Not all of these things need to be stored on SharePoint itself, but they should all be easy to find within a well-designed SharePoint intranet’s menu structure. The scope of building an intranet is considerable, but SharePoint’s out-of-the-box design means that good planning is your main task. Here are the things you should do in your initial planning phase.
Start With What You Already Have
Bad design happens when you base it on what you think people should do, instead of what they actually do. To avoid this issue, spend a significant amount of time exploring and listing what internal sites and documents your employees already use, and what external sites and other resources are most important to them. Your goal at this stage is to find and list (on paper or in a spreadsheet) all the items people constantly use. Add to this list any HR items, then add any extras you would like your intranet to have, such as a company directory, events calendars, or newsfeed.
Making your list of existing items may take months. Don’t skimp on this process. Don’t try to organize items as you go. You can group them loosely, but the end result should be mostly unstructured, because your goal is to build a better structure.
Plan a Structure
When you have your master list of items, it’s time to look at the best way to organize them. Group them first into 2 large categories: unrestricted versus restricted access within your company. Then arrange the restricted items into as few groups as possible, for example “management plus accounting,” “people who work with Client X,” “the IT team.” If you’re ending up with groups that look like “management, everyone in IT except Joe, 3 people from accounting, and these 2 other employees” then you’re getting too narrow; that’s probably not an item that belongs on the intranet in the first place.
These results tell you what sub-sites you need to create. Your intranet will consist of a home site (the hub) connected to a number of sub-sites. It will all look like a single website with the same master navigation. All of these sites should be created as a SharePoint Communications Site, rather than a SharePoint Team Site, and should use SharePoint’s 3-tier “mega menu” option. This setup is suitable for the complex navigation needed for an intranet.
Build Navigation on Paper First
Now (and still on paper) look again at your master list of items, and think about how to arrange them for navigation. Your navigation layout doesn’t correlate to what sub-site anything is stored on, so your previous categories aren’t relevant here. Start by deciding on 5 to 7 top-level navigation headers: short names, broad categories. It’s okay if a few items on your list belong under more than one header, but if a large number of items do, your header choices need work.
Run your results past some randomly selected employees for feedback: give them a list of items, tell them your chosen headers, and ask which header they’d expect to find each item under. Then drill down further, choosing second-level subheaders to group items within each top-level menu. Once you have all these things in place, you’re ready to actually build your intranet. The resources below are a good starting point to learn the nuts and bolts of that process.
Resources and References
Microsoft; Guide to the Intelligent Intranet – https://learn.microsoft.com/en-us/sharepoint/intelligent-internet-overview
Shari Oswald; SharePoint: Creating Communications Sites – https://www.linkedin.com/learning/sharepoint-creating-communication-sites
Microsoft Forms Help and Learning: https://support.microsoft.com/en-us/forms